I never was very successful at making muffins. That was until I located this recipe on one of our blueberry picking trips to Johnson Blueberry Farm. The owners have a file box there with recipes the customers can take home. I grabbed a muffin sheet and the first recipe on it is the one I'm sharing with you. The recipe is easy, uses items I have on hand, and yummy. Try this recipe, and I bet you'll never make boxed blueberry muffins again!
1 egg
3/4 cup milk
1/2 cup oil
2 cups flour
1 tablespoon baking powder
1 teaspoon salt
1/2 cup sugar (if blueberries are a little tart, add an extra 2 tablespoons sugar)
1 cup blueberries
Preheat oven to 400 degrees. Line 12 muffin cups with paper liners. Whisk egg, milk, and oil in a small mixing bowl. In a large mixing bowl, mix together flour, baking powder, and salt. Add liquid ingredients to the dry ingredients and stir until just moistened (some lumps will remain). Fold in blueberries and put int muffin pan. Bake 15-20 minutes or until browned.
Sunday, February 10, 2013

Friday, February 8, 2013
Stained Glass Cookies
 |


I know I’m late in posting this for Christmas but I figured I could post in time for Valentine’s Day.
We used the basic Wilton sugar cookie recipe (something sturdy, not soft). Bake on foil until almost done. Add crushed hard candy (we used Jolly Ranchers, put in ziplock baggie and beat with a hammer) to the cut-out spot. Return to oven until candy is melted. Allow to cool completely. Peel off foil. Easy and beautiful!
If you want to hang them, be sure to use a straw to poke a hole in the top of them before baking.
If you want to hang them, be sure to use a straw to poke a hole in the top of them before baking.
This was the day my kids thought I was amazing. Oh, and we were able to learn about how heat melts things, an added bonus! It’s sooo fun watching those candies melt!
Wednesday, February 6, 2013
Washer Necklaces

I got this idea from Family Fun Magazine--a very useful, well-worth-the-money magazine we get (a gift from my mom). I made some of these for nursery workers, teachers at church, and grandmothers. I hope to make some more soon. They were something the two older girls could help with, so that should tell you how easy it was! It was also pretty inexpensive.
What you need:
Washers (any size will do)
Nail polish
Ribbon (about 30 inches per necklace, depending on how long you want them)Monday, February 4, 2013
Chicken and Dumplings
Chicken and Dumplings is one meal that my entire family loves. I actually have kids standing at the stove begging for some! When I announce that we’re having chicken and dumplings, I usually hear cheers! This may seem like nothing to you but to me it’s huge (I have some picky kids).
I’m sorry but this is not really a healthy meal. It’s southern comfort at its best.
I use my food processor for this and have never tried not using it. If you don’t have one, try just cutting in the fat and stirring the rest in.
This adapted from Cook's Country (Chicken with Slicks).
Dumplings:
2 cups flour
½ teaspoon salt
2 tablespoons of chicken fat (rises to top of cooled broth after you boil chicken that has skin on it), if you don’t have chicken fat, use shortening or *gasp* bacon grease
1 tablespoon oil
½ cup warm chicken broth
Process in flour and salt in food processor. In a measuring cup with spout, add the chicken fat, oil, and broth.
Slowly add liquid to food processor while processing. Process until incorporated. Remove dough from processor. Roll half of dough at a time on floured surface to 1/8 inch. Cut into 1 inch thick strips (I use a pizza cutter for this), about 4-6 inches long. Line a large plate with wax paper and place a single layer of dumplings on it, place another sheet of wax paper over them and repeat with more dumplings and wax paper. Freeze for 10-30 minutes.
4 ½ cups chicken broth
2 cups milk
Chicken: cooked and pulled apart (I usually do about two chicken breasts and this is plenty of meat)
Salt & Pepper to taste
Warm broth in Dutch oven over medium-high heat until simmering. Add the dumplings, stirring while adding. Add milk and return to a simmer. Reduce heat to low-medium and cook about 30-45 minutes or until the dumplings are desired doneness (not tough), stirring often to prevent sticking.
I usually add the milk with the broth before adding the dumplings but it tends to boil over so you can do that, just be careful.
Serve with corn bread and a veggie.
Friday, February 1, 2013
Wall Calendar for less than $10

I wanted a big wall calendar that the kids could help me update every month and add holidays, birthdays, etc. I saw them for more-than-I-wanted-to-spend and decided to tackle making my own from the things I already had.
It was one of those projects I put off for a few months. I think I was scared to do it. Ha! It finally occurred to me one day that if I messed it up, it wasn’t like I had a ton of money invested in it so it wouldn’t be a big deal. It took me one afternoon to do it and I was pretty pleased with the results. It’s certainly not perfect but it fits our needs and most importantly, the girls love it!
I measured the elements and figured out the layout. I sewed a very simple background (two pieces of fabric since it was pretty thin, hemmed the edges, and sewed a placket for the dowel to fit through). Using a water-soluble fabric pen, I marked where I wanted to sew the lines. Then I laid one single sheet of clear vinyl over the top, pinning at the far edges just to keep it held in place, and sewed over the lines I had marked. I then cut away the excess vinyl. I felt like using a whole sheet of vinyl was much easier than trying to cut and sew individual pieces.
It was my first experience with sewing clear vinyl and I admit it was a little difficult at times but once I got used to it, it wasn’t so bad.
Here’s what I used:
Blue and white striped fabric I bought at Hudson’s years ago (probably $1 a yard)
A dowel (for 80something cents at Wal-Mart)
Calendar elements from Dollar Tree (a background, month banners, and numbers with holidays) in three different packs for a total of $3
Two different packs from Dollar Tree (day of the week and weather) for a total of $2
Some clear vinyl from Wal-Mart for $2 a yard

Wednesday, January 23, 2013
Snowballs
 Last week it snowed here. For those who live where it normally snows, our little 1 inch dusting wouldn’t be a big deal. For those who live in the deep south and are accustomed to snow being a rarity, understand just how excited we were!
The bad thing (or good thing, depending on how you look at the situation!) is that snow around here rarely lasts more than a day. Such was the case Thursday. By the time we played in it, came in, got warm and dry, and went back out, it was starting to melt and turning into a muddy mess! My children were pretty distraught. So I decided since I had to make cookies for a funeral at church the next day, I would include the kids and we would make snowballs! Of course until we dipped the first tray of them into the powdered sugar, my kids kept saying “These don’t look like snowballs!” But then after the first dipping, they nodded their heads and said (quite emphatically!), “Snowballs!” And so we ended our snow day with getting “snow” (powdered sugar) all over our kitchen while making snowballs. Of course, these tasted a bit better than the real ones.
Here’s the recipe. It’s from Land O’ Lakes and I later discovered my mom’s recipe is the
same except hers calls for ¼ cup powdered sugar in the cookies instead of granulated
2 cups all-purpose floursame except hers calls for ¼ cup powdered sugar in the cookies instead of granulated
2 cups finely chopped pecans
1/4 cup sugar
1 cup butter, softened
1 teaspoon vanilla
Powdered sugar
Heat oven to 325°F. Beat the butter and sugar, add the flour and mix until combined. Mix in the pecans. Shape dough into 1-inch balls. Place 1 inch apart onto ungreased cookie sheets. Bake 18-25 minutes or until very lightly browned. Cool 5 minutes; roll in powdered sugar while still warm and again when cool.
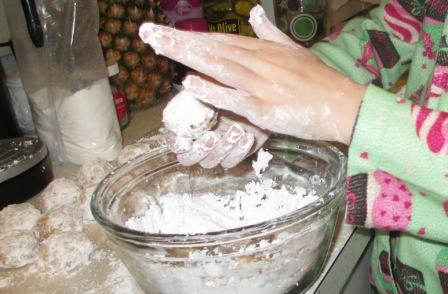 |
| J's hands helping! |
 |
| A's hands helping! |
Beignets (Cook's Country)
I have never tried making beignets. I admit that I've been afraid of them. I don't have a problem making yeast breads but beignets seem so...well, difficult! Also, I figured I couldn't possibly do them for breakfast...yeast stuff takes so long!
Then I received my Cook's Country magazine the other day with beignets on the cover. I immediately turned to the recipe and looked at the ingredients and realized I had everything in the house to make them. I even had a reason to make them (a friend came over for supper and I know I can always try new stuff on her)! I just couldn't do it.
So this morning I was up at 4:30 and while I was working in the kitchen, I realized I would have time to make them to go with Austin's breakfast! Then I discovered I only had ingredients for half a batch which turned out to be perfect for us! Especially since I burned a few at first.
I’m a tea drinker but I admit to making myself a cup of café au late this morning to go with these! It just felt right.
I'm sorry I don't have a picture to prove I made them. I can promise you they were ugly but they were so light and airy—simply perfect! They were gone pretty quickly since my girls woke up early this morning. So, no time to snap a picture. I'll try to next time I make them.
The dough is pretty sticky so be sure to flour your rolling surface well. Also, don’t drain on paper towels, simply put a cake wire rack over a cookie sheet!
1 cup warm water (about 110 degrees)
3 tablespoons sugar
1 tablespoon instant or rapid rise yeast (you'll need two packets--one is almost enough but not quite)
2 large eggs
2 tablespoons oil (more for frying in)
Remove to a wire rack that’s been placed over a cookie sheet. Sprinkle with powdered sugar immediately. Serve.
NOTE: Admittedly we've discovered we prefer them with a simple cocoa, powdered sugar, milk icing.
 |
| finished product |
 |
| Cutting them out |
I have never tried making beignets. I admit that I've been afraid of them. I don't have a problem making yeast breads but beignets seem so...well, difficult! Also, I figured I couldn't possibly do them for breakfast...yeast stuff takes so long!
Then I received my Cook's Country magazine the other day with beignets on the cover. I immediately turned to the recipe and looked at the ingredients and realized I had everything in the house to make them. I even had a reason to make them (a friend came over for supper and I know I can always try new stuff on her)! I just couldn't do it.
So this morning I was up at 4:30 and while I was working in the kitchen, I realized I would have time to make them to go with Austin's breakfast! Then I discovered I only had ingredients for half a batch which turned out to be perfect for us! Especially since I burned a few at first.
I’m a tea drinker but I admit to making myself a cup of café au late this morning to go with these! It just felt right.
I'm sorry I don't have a picture to prove I made them. I can promise you they were ugly but they were so light and airy—simply perfect! They were gone pretty quickly since my girls woke up early this morning. So, no time to snap a picture. I'll try to next time I make them.
The dough is pretty sticky so be sure to flour your rolling surface well. Also, don’t drain on paper towels, simply put a cake wire rack over a cookie sheet!
1 cup warm water (about 110 degrees)
3 tablespoons sugar
1 tablespoon instant or rapid rise yeast (you'll need two packets--one is almost enough but not quite)
2 large eggs
2 tablespoons oil (more for frying in)
3 cups flour
3/4 teaspoon salt
Powdered sugar
Combine 1 tablespoon sugar, yeast, and water in bowl. Stir and let sit for 5-10 minutes until foamy (it'll look like the yeast has risen to the top). Whisk the eggs and oil into the yeast mixture. Combine the flour, rest of the sugar, and salt in a separate bowl. Add to the yeast and egg mixture and stir vigorously to combine. Cover the bowl with plastic wrap (or a lid if the bowl has one). Refrigerate 1 hour.
Remove the dough from the refrigerator. Divide dough into two parts. Pat into a rough rectangle on floured rolling surface. Roll with a rolling pin to about ¼ inch thick. Cut into 3 inch squares (I did them smaller and they lost their shape due to not having enough flour!) and fry in oil at 350 degrees (I just had my burner on medium) until golden, turn to cook other side.
NOTE: Admittedly we've discovered we prefer them with a simple cocoa, powdered sugar, milk icing.
Subscribe to:
Posts (Atom)